🧑‍💻 Upcoming webinar: Market with your email signature every time you hit send

Sign up now
Email

How to add email notes on Apple Mail: A simple guide

How to add notes to your emails in Apple Mail, especially with the help of Mailbutler's Notes. Read more here.

First published

28.06.2024

Last edited

18.11.2024

Read time

4 minutes


By Irena

Irena is an experienced Content and Email Marketer who loves animals, slow mornings, and all things Tolkien.

Adding notes to your emails can be a game-changer for your productivity and organization. In this article, we’ll show you how to add notes to your emails in Apple Mail, especially with the help of Mailbutler's Notes, a handy extension that makes life so much easier. Whether you’re jotting down crucial details or simple reminders, this guide will make the process a walk in the park.

Juggling countless emails daily can be like trying to catch butterflies in a storm. Important details often slip through the cracks, but Apple Mail, combined with Mailbutler, helps you keep everything in check. Let’s see how adding email notes can transform your Apple Mail experience.

Why Add Notes to Your Apple Emails?

Adding notes to your Apple Mail emails lets you:

  • Keep Key Info Handy: Attach important details right to your emails.
  • Stay Organized: Manage tasks and reminders effortlessly.
  • Improve Communication: Share notes with colleagues for better teamwork.


How to Add Notes on Apple Mail: Step-by-step Guide

For macOS Sonoma:

  • Access an Email: Open an email in your inbox or sent folder.
  • Add a Note: Hover over the message header and click the Note button. The Mailbutler sidebar will appear.
    add a Note on Apple Mail macOS Sonoma
  • Write Your Note: Type your note in the sidebar. It saves automatically.Mailbutler Apple Mail note
  • Alternative Method:
    • Open the Mailbutler Sidebar manually by clicking the Mailbutler icon.
    • Click the Note button in the sidebar.
    • Write your note and it will be saved automatically.

Mailbutler email note macos Sonoma

  • Deleting a Note: Hover over the note to show the bin icon, then click it to delete.

For macOS Ventura or Older:

  • Access an Email: Open an existing email or start composing a new one.
  • Open the Sidebar: Click the sidebar icon to open the Mailbutler Sidebar.
  • Add a Note: Click the Note button in the sidebar. Write your note, which saves automatically.
    Add note on macOS Ventura with Mailbutler
  • Create a Note from Text: Highlight the desired text in your email, right-click, and select "New Note from..."

create a Note from text in your email

  • Deleting a Note: Hover over the note to show the bin icon, then click it to delete.

You can also check Paul Minors video tutorial about email notes in macOS Ventura or older:

Following these steps ensures you can efficiently add and manage notes in Apple Mail using Mailbutler. For more detailed instructions, visit the Mailbutler support page.

Benefits of using Mailbutler's Notes

Seamless Integration: Mailbutler fits into Apple Mail like a glove, making it a breeze to add, view, and edit notes. You won't have to leave your secure email client, which means everything you need is right at your fingertips. It’s like having an extra hand that’s always ready to jot down important thoughts without skipping a beat.

Shared Notes: Sharing notes with your team becomes as easy as sharing a smile. It's like passing along a secret note in class, but instead of whispers, you get enhanced collaboration. Everyone stays on the same page, making teamwork smooth and efficient.

Task Management: Converting notes into tasks is like turning thoughts into actions. Your to-do list becomes a well-oiled machine, managing itself right from your email. Imagine your tasks marching off your screen, neatly checked off, keeping your productivity on an all-time high.

With Mailbutler, your emails transform into a dynamic workspace, where notes and tasks coexist harmoniously, boosting your productivity like never before.

Shared inbox and shared notes

share email notes in Apple Mail

Mailbutler’s shared inbox and shared notes feature is a game-changer for teamwork. It transforms your inbox into a collaborative workspace where everyone on your team can add their thoughts, updates, and ideas directly to emails. This makes communication seamless and ensures everyone stays on the same page. Imagine a virtual bulletin board where notes are instantly visible to all, enhancing transparency and productivity.

This feature promotes unity and ensures that nothing falls through the cracks. It's perfect for keeping everyone informed and aligned, making your team more efficient and effective.

Related post: Flagging in Apple Mail

Mailbutler's Tags combined with Mailbutler's Notes

Mailbutler’s email tagging feature works perfectly with note-taking to keep your inbox organized. You can add multiple tags to your Apple Mail emails and Mailbutler items, including notes and tasks. This system helps you develop an efficient organizational structure, making it easy to stay on top of your inbox. Tags act like digital folders, and when combined with notes, they provide additional context, making information easy to locate and manage.

By tagging your notes, you can filter and prioritize them, ensuring that important details are never overlooked. This integration boosts productivity by allowing you to quickly identify and access the most critical information.

Similar Post: How to add email contacts in Apple Mail

Wrapping up

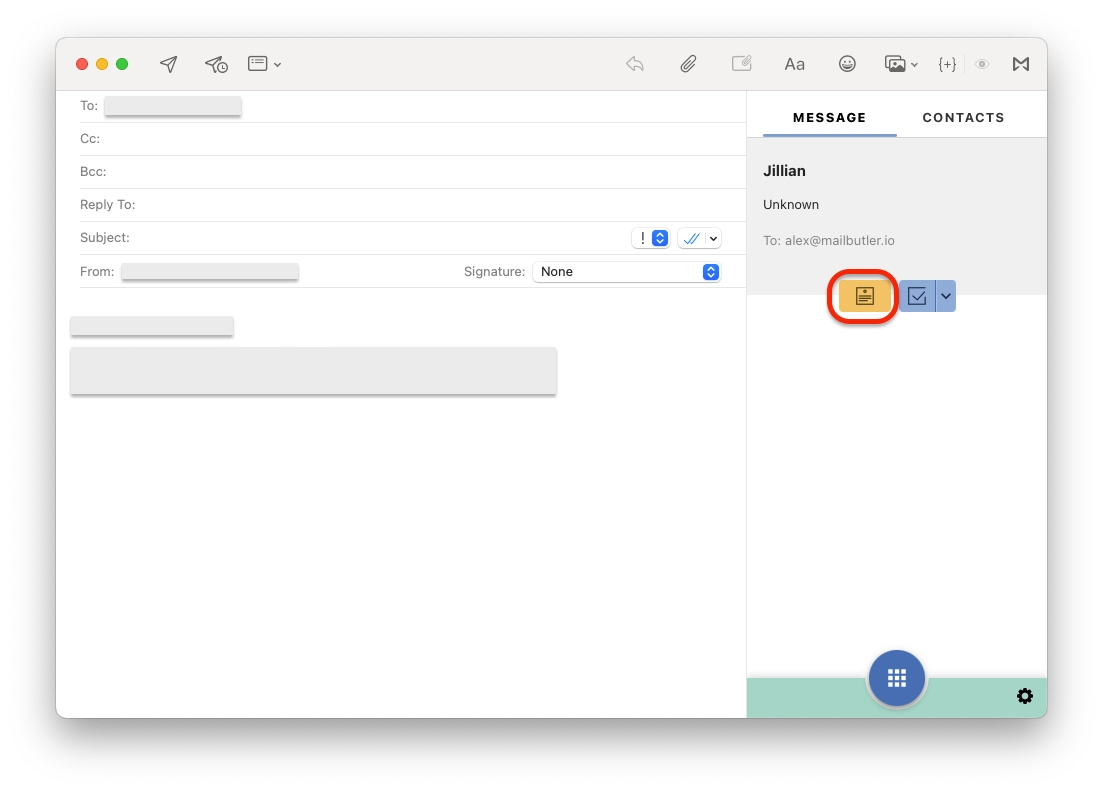
Using Mailbutler with Apple Mail makes adding notes to emails easy and keeps everything organized. You can add, view, and edit notes directly in your email client. Sharing notes with your team is simple, improving collaboration.

Mailbutler's tagging feature lets you categorize emails, notes, and tasks, helping you prioritize and manage information effectively. This combination turns your inbox into a well-organized workspace, making it easier to handle important tasks and communications.

Recommended articles

Leave a comment

Your email address will not be published. Required fields are marked *

It only takes 30 seconds to get started

It only takes 30 seconds to get started

Try for free