Mailbutler news
Mailbutler Now Available in Microsoft AppSource
Mailbutler GmbH announces the availability of its flagship product, Mailbutler, in Microsoft AppSource, an online cloud marketplace.
Read on to find out more about the latest version of the Mailbutler Dashboard and what you can use it for.
Irena is an experienced Content and Email Marketer who loves animals, slow mornings, and all things Tolkien.
Last year, we introduced an extremely important change to our core product - the integrated Mailbutler Dashboard.
Improving your experience with the Mailbutler desktop extension has always been one of our top priorities, so integrating the Dashboard into the Sidebar of the Mailbutler app was a consistent and completely logical step.
Before March 2021, you had to leave the Mailbutler app and move to your web browser to access your Dashboard.
This, of course, was inconvenient and time-consuming.
Today, on the other hand, you have everything you need for optimal email communication in one place - your inbox.
Read on to find out more about the latest version of the Mailbutler Dashboard and what you can use it for.
Design-wise, the Mailbutler Dashboard is minimalist, straightforward, and intuitive. We decided to keep it simple so you can focus on the tasks at hand and get things done faster.
![]()

As you can see from the screenshots above, the Mailbutler Dashboard is integrated into the Sidebar of your mailbox and just two clicks away. First, you need to click on the Mailbutler icon, and then hit the Dashboard button at the bottom of the side panel.
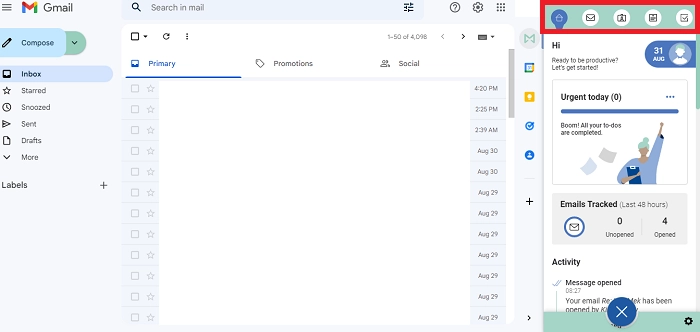
Once you open the Dashboard, you’ll see five tabs: Activities, Messages, Contacts, Notes List, and Tasks List. Here’s what they look like:

The Activities tab provides you with a chronological list of the actions you and your contacts have taken. These include:
In the Activities tab, you can also see your most urgent to-dos for the day and the status of the emails you’ve sent and enabled tracking for in the last 48 hours (opened or unopened).

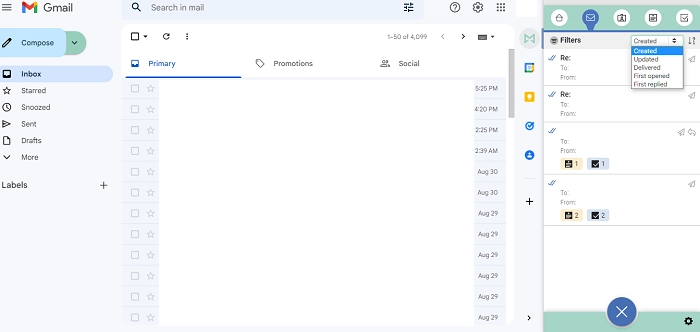
In the Messages tab, you can access all the emails you’ve sent.
Here, you can check when each of your messages was delivered (just hover over the airplane icon) and whether they have been opened or not (one checkmark for not yet opened, two checkmarks for opened).
To see more details about a message you’ve sent, you just need to click on it. Once you do, you’ll be able to see:
Last but not least, the Messages tab is where you can add notes and tasks (including follow-up tasks, previously Mailbutler follow-up reminders) to your emails.
To keep everyone on your team up to speed, you can also share important notes and tasks with them. Don't have any collaborators to share with? No worries; you can invite people to collaborate with the Mailbutler Collaborators feature directly in your mailbox (more on this below). After you've done that, you can simply click the sharing button and share with individual Mailbutler users from a list of collaborators.

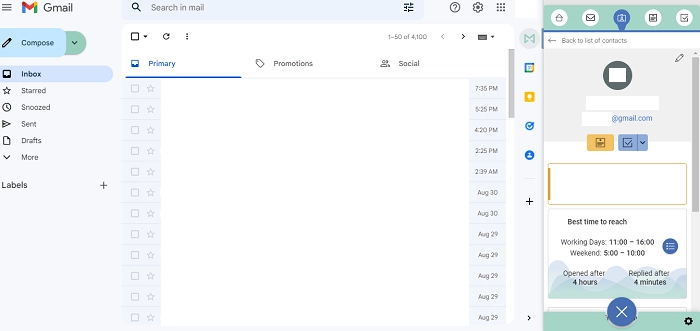
In the Contacts tab, you can see all of your existing email contacts and create new ones. Additionally, if you click on any contact, you’ll be able to attach notes and tasks to it and share them with your teammates.
Plus, your contact’s card shows you when it’s best to reach them based on the tracking data Mailbutler collects for their email address. (This works only when you’ve enabled email tracking.)
As the name suggests, the Notes List tab provides you with a list of all the notes you’ve added to both emails and contacts. Here, you can edit, share, and delete notes. If your note list is very long, you can apply filters to find the items you’re looking for more quickly.
Finally, the Tasks List tab is exactly that - a list of all the to-dos you’ve created with Mailbutler. This includes follow-up tasks (previously follow-up reminders).
In this tab, you can edit, share, complete, and delete tasks.
You can also add reminders to your to-dos and remove them. Lastly, you can instruct Mailbutler to set a task to “completed,” remove the reminder, or delete the to-do if you receive a reply using the Automations functionality.
Try Mailbutler & Boost your Productivity

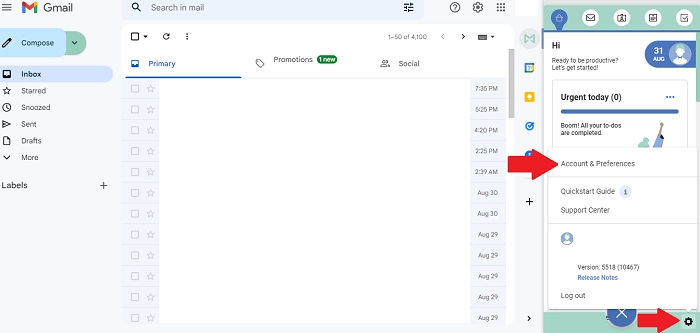
To take advantage of the other Mailbutler features, you need to click on the settings button (the little cog in the bottom right-hand corner) and select Account & Preferences from the menu that will open up. Here, you can:
If you have any questions regarding the Mailbutler Dashboard, feel free to contact our support team at support@mailbutler.io. We’re always happy to help!


Jason
12 Nov 2023
Jason
12 Nov 2023
How can you hide the dashboard?
12 Nov 2023
James
13 Nov 2023
James
13 Nov 2023
Hi Jason, you can go back to the Sidebar by clicking the X button where the Dashboard button was. You can also simply click the X in the window to hide Mailbutler completely.
13 Nov 2023