Definition of Outlook distribution list
Outlook's distribution list feature simplifies email communications within large organizations by enabling the creation of email groups. This tool eliminates the need for selecting each recipient individually for every email.
The feature makes it easier to send messages to groups by treating them as one unit, saving time and effort in communicating with different parts of an organization.
Benefits of creating a distribution list
Creating a distribution list can greatly benefit your communication strategy in several ways.
- Organizational Clarity: By categorizing contacts into groups based on roles, departments, or projects, distribution lists ensure messages are targeted accurately.
- Enhanced Privacy: Selectively shares information with specific groups, protecting privacy and maintaining professionalism by keeping sensitive data confined to intended recipients.
- Time Savings: Eliminates the need to manually input each recipient's email address, speeding up communication and reducing email errors.
- Ease of Maintenance: Allows for simple management through central updates to contact information or membership changes, ensuring consistent and prompt delivery of messages to all members.
- Consistent Communication: Ensures all members receive important updates and announcements in a timely manner, promoting consistency in messaging across the organization.
How to create a distribution list in Outlook 365
To create a distribution list in the Outlook desktop app, follow these steps:
- Open Outlook: Launch the Outlook desktop application on your computer.
- Access Contacts: Navigate to the 'People' tab, often found at the bottom of the Outlook window, to view your contacts list.
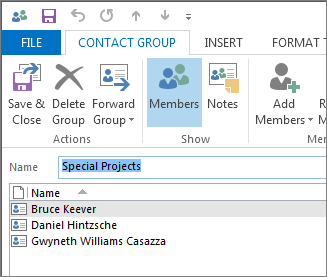
- New Contact Group: Look for the 'New Contact Group' button in the toolbar. Click it to start creating your distribution list.
- Name Your Group: Assign a name to your contact group in the provided field. Choose something that clearly represents the purpose or the members of the group.
- Add Members: Click on 'Add Members' to select contacts from your Outlook Contacts, Address Book, or by typing email addresses directly. Add all the individuals you wish to include in your distribution list.

Source: Microsoft
- Save and Close: Once you've added all the desired contacts, click 'Save & Close' to finalize your distribution list.
By following these steps, you've now created a distribution list in the Outlook desktop app. This enables you to send emails to multiple recipients quickly, ensuring efficient communication with your designated group.
Creating a distribution list in Outlook on Mac
To set up a distribution list in Outlook for Mac (Office 365 subscription plans for users of Outlook 2016), follow these straightforward steps:
- Start with Outlook: Open the Microsoft Outlook on your Mac.
- Find 'People': In the Outlook navigation pane, click the "People" icon situated on the left side.
- Initiate New List: Press the "New Contact List" button to begin creating your list. This is where you'll give your distribution list a name and start adding members.

Source: Microsoft.com
- Add Members: Enter the names or email addresses of the individuals you wish to include in your list. You can add as many recipients as needed.
- Save Your List: After adding all the necessary contacts, remember to save your new distribution list to preserve your changes.
- Optional Privacy Setting: If you prefer to keep the recipients' details confidential when emailing the group, check the "Use Bcc to hide member information" option. This ensures that members do not see each other's email addresses when receiving your messages.
Your new contact list will be visible within the "On My Computer" section of your Outlook contacts, allowing you to send emails to the entire group just as you would to an individual.
To access your "On My Computer" folders, please follow these instructions:
- Open the Outlook menu and choose "Preferences."
- Within the "Outlook Preferences" dialog, look for "Personal Settings" and click on "General."
- In the "General" settings, uncheck the option that says "Hide On My Computer folders."
By doing this, you'll be able to see and manage your folders stored locally on your Mac, including your newly created contact list.
Making a distribution list in Outlook on Windows
Source: Microsoft.com
To create a distribution list in Outlook for Windows, follow these simplified steps:
- Open Outlook: Begin by opening the Outlook application on your Windows computer.
- Navigate to Contacts: Click the "People" icon, typically found at the bottom of the Outlook window, to access your contacts.
- Initiate New Group: Choose "New Contact" then select "Contact Group" from the dropdown menu. This action opens a window for creating your group.
- Name and Add: Assign a name to your group and start adding members by typing their names or email addresses, and pressing Enter after each one.
- Save Your List: After including all members, hit "Save & Close" to save your group.
How to edit and update a distribution list in Outlook
To edit and update a distribution list in Outlook, whether on a PC or Mac, you can follow these general steps:
For Windows Users:
- Open Outlook: Launch the application on your PC.
- Go to 'People': Click the 'People' tab at the bottom of the window to access your contact lists.
- Find Your List: Double-click the distribution list you wish to edit from your contacts.
- Edit Members: To add new members, click 'Add Members' and choose from your contacts or type new email addresses. To remove members, select the individual's name and press 'Remove.'
- Update Details: You can also change the group's name, add notes, or modify the contact's email address directly within the list's details.
- Save Changes: Once you've made all necessary updates, click 'Save & Close' to apply the changes.
For Mac Users:
- Launch Outlook: Start Outlook on your Mac.
- Access Contacts: Navigate to the lower menu and select the 'Contacts' option.
- Open the List: Search for and double-click on the distribution list you need to update.
- Modify Members: Use the '+' sign to include more members or highlight a name and click the '-' sign to remove someone.
- Adjust Information: Similar to Windows, you can edit the list's name or other details as needed.
- Apply Updates: Ensure you save your changes by clicking 'Save & Close' or a similar command.
Following these steps will help you keep your distribution list accurate and useful.
How to test a distribution list
To ensure your distribution list in Outlook is functioning correctly, you can perform a simple test by following these steps:
- Open Outlook: Launch the application on your computer to get started.
- Compose a New Email: Click the "New Email" button to open a blank message.
- Address the Email: In the "To" field, input the name of your distribution list. You can type it manually or select it from your contacts using the address book.
- Write Your Test Message: Draft a brief message that indicates it's a test.
- Send the Email: After composing your message, press the "Send" button. This action will distribute your email to all members of the list.
By conducting this test, you can confirm that your distribution list is set up properly and that all members receive your emails.
Similar Post: Add Shared Inbox to Outlook
What's the difference between distribution lists, distribution groups, and contact groups in Outlook?
In Outlook, "distribution lists," "contact groups," and "distribution groups" might seem similar because they all help send emails to multiple people at once, but there are some key differences:
Distribution Lists
These are used in older versions of Outlook to send an email to many recipients together. They are a collection of email addresses that you can email at the same time. In personal Outlook accounts, they help manage and email groups easily.
Contact Groups
In newer Outlook versions, what used to be called a distribution list is now known as a "contact group." It works the same way: a group within your contacts that includes several people’s email addresses. When you email the group, everyone in it gets the email. It's great for personal use or small businesses to group contacts for easy emailing.
Distribution Groups
These are for larger organizations using an Exchange Server or Office 365. Managed by IT admins, they're used to email departments or teams. Distribution groups have more settings like who can email the group or applying special rules. They appear in the global address list, so anyone in the organization can see and use them.
Main Differences:
- Use: Contact groups are for individual Outlook users. Distribution groups are for whole organizations and need an admin to manage.
- Management: You can change your contact groups yourself, but distribution groups need someone with admin rights.
- Features: Distribution groups offer more control for organizations, like setting rules on who can send emails to the group.
So, whether for personal Outlook use or within a bigger company setup, understanding these options helps pick the right way to send group emails.
How to manage your Outlook messages better
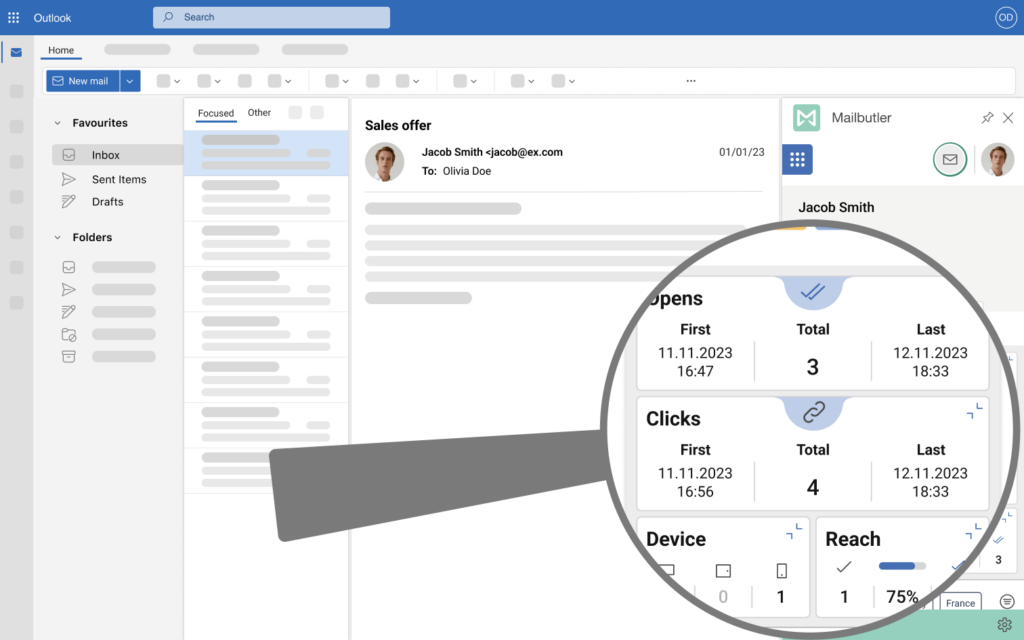
Mailbutler's email tracking details
Boosted by Mailbutler, Outlook's email tracking offers a key advantage, showing when emails are opened and helping pinpoint the best times to send them for maximum impact.
This data is important for timely follow-ups or moving projects forward, ensuring you're always proactive. With Mailbutler's real-time notifications, you can adjust your strategy based on real engagement, making every email count and improving your communication with precision.
Follow-up reminders in Outlook
Setting follow-up reminders on emails is another powerful feature within Outlook that aids in managing your inbox efficiently. By flagging emails for follow-up, you can assign reminders to yourself to respond to or readdress specific messages at a later time.
This ensures important emails do not get lost in a busy inbox and that you maintain timely communication with clients, colleagues, and partners. Outlook follow-up reminders can be customized for specific dates and times, fitting seamlessly into your workflow and keeping your priorities in check.
Outlook Tasks
The use of Outlook Tasks further boosts your ability to stay organized and productive. Converting emails into tasks allows you to directly create actionable items from your communications, complete with deadlines and priority levels.
This integration improves your workflow by keeping all related information in one place, making it easier to track project progress and deadlines. Outlook Tasks can be a game-changer for managing your workload, offering a clear overview of your to-dos and ensuring that no task is overlooked.